Battery switch on travel trailer function is crucial for managing your RV’s power. Understanding how this simple yet vital component works is key to enjoying worry-free adventures. This guide will walk you through everything from the different types of switches available and their operation to troubleshooting common issues and essential maintenance tips. We’ll cover connecting and disconnecting batteries safely, plus how the switch integrates with your trailer’s overall electrical system.
We’ll explore the various types of battery switches—single, dual, and rotary—and detail how to operate each one correctly. We’ll also delve into the importance of safe battery handling and connection, providing practical advice to prevent corrosion and other problems. Learn how to diagnose and fix common battery switch issues, and discover how to maintain your system for years of reliable service.
Understanding Battery Switch Functionality in Travel Trailers
Your travel trailer’s battery switch is a crucial component, acting as the central control for your trailer’s power system. It allows you to disconnect or connect your house batteries from the rest of the electrical system, preventing battery drain when your trailer isn’t in use and enabling safe work on the electrical system. Understanding its function is key to maintaining your trailer and preventing costly problems.Battery switches in travel trailers serve a vital purpose: managing the flow of power to and from your trailer’s batteries.
This is important for conserving battery life, protecting sensitive electronics, and ensuring safe maintenance. Without a properly functioning battery switch, you risk draining your batteries completely, potentially damaging them beyond repair. Furthermore, a battery switch allows you to isolate the batteries for safe electrical work, preventing accidental shocks or short circuits.
Planning a trip? Don’t forget to sort out your travel insurance! Check out Aon travel insurance for comprehensive coverage. Then, if you’re an audiophile, make sure your listening experience is top-notch on the road by checking out this guide on audiophile travel setup for tips on packing your favorite gear. These two things together will ensure a smooth and enjoyable trip!
Battery Switch Types
Several types of battery switches are commonly used in travel trailers, each offering slightly different functionality. The most common are single battery switches, dual battery switches, and rotary switches. A single battery switch controls only one battery bank, while dual switches control two separate banks, often used for a house battery and a starting battery. Rotary switches offer multiple positions, allowing for more control over power flow.
Operating a Typical Battery Switch
Correctly operating your battery switch is simple but essential. Before attempting any operation, ensure you understand your specific switch’s labeling and functionality. Most switches have clearly marked positions indicating ON, OFF, and sometimes additional settings for specific battery banks.
- Identify Switch Positions: Familiarize yourself with the markings on your battery switch. Common positions include “Off,” “Both,” “Battery 1,” and “Battery 2.”
- Turn the Switch to “Off”: Before performing any maintenance or disconnecting from shore power, always turn the switch to the “Off” position. This completely isolates the batteries from the rest of the trailer’s electrical system.
- Select Desired Position: Once you’ve completed any necessary maintenance or are ready to use your trailer, turn the switch to the desired position (“Both” to use both batteries, “Battery 1” or “Battery 2” to use only one).
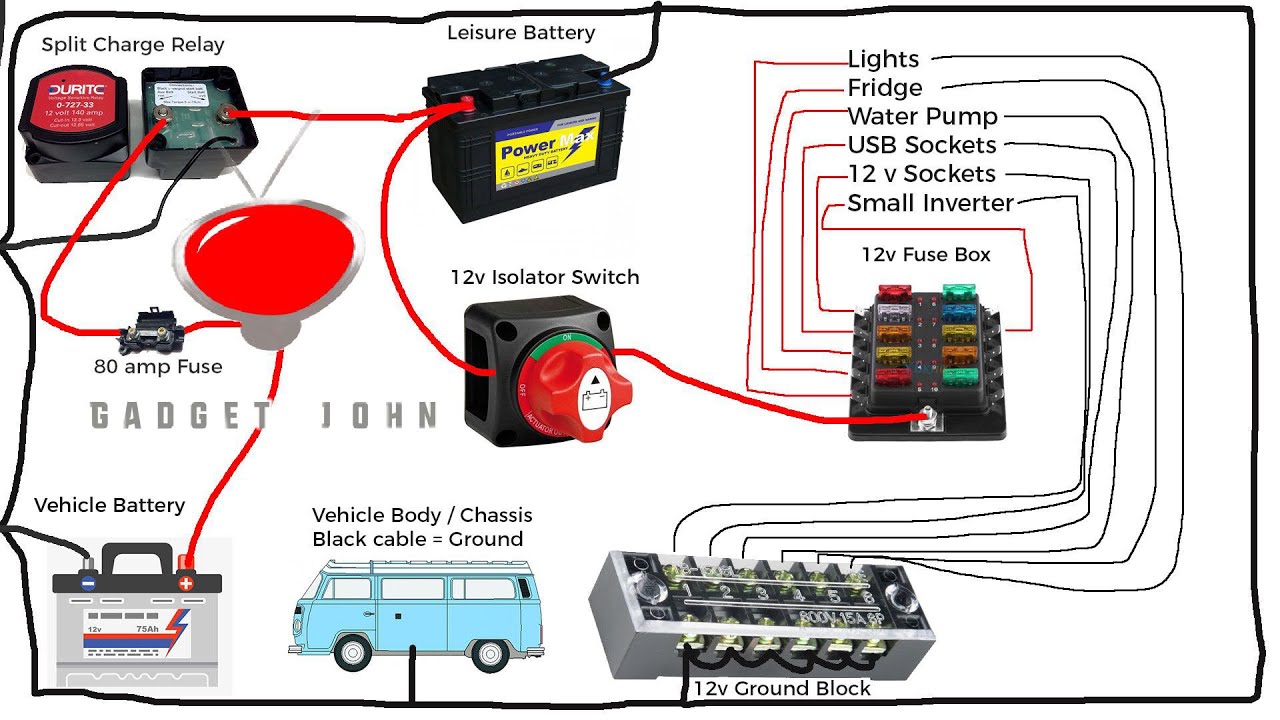
Battery Switch Power Flow Diagram, Battery switch on travel trailer function
The following diagram illustrates the power flow within a typical dual-battery system using a rotary switch. Imagine a simple circuit. The switch acts like a gate, controlling the path of electricity.[Diagram Description: A simple flowchart showing a dual battery setup with a rotary switch. The switch has four positions: OFF, Battery 1, Battery 2, and Both. Arrows indicate the flow of electricity.
In the “OFF” position, no power flows from the batteries to the trailer’s electrical system. In “Battery 1,” only Battery 1 is connected. In “Battery 2,” only Battery 2 is connected. In “Both,” both Battery 1 and Battery 2 are connected to the trailer’s electrical system, providing combined power.]
Planning a trip? Don’t forget to sort out your travel insurance! Check out this page on Aon travel insurance to compare options and find the best coverage for your adventure. And if you’re an audiophile, you’ll want to check out this guide on audiophile travel setup before you go – it’s all about making sure your tunes sound amazing wherever you are.
Getting insured and setting up your music are key steps for a smooth trip!
Connecting and Disconnecting Batteries
Connecting and disconnecting your travel trailer’s batteries is a crucial part of maintaining your RV’s electrical system. Doing it correctly ensures safe operation and prevents damage to your equipment and, importantly, yourself. This section will guide you through the process, highlighting best practices and safety measures.Proper battery connection is vital for reliable power. Loose connections can lead to voltage drops, reduced performance of appliances, and even the risk of fire.
Conversely, improper disconnection can leave your system vulnerable to damage.
Connecting Batteries
Connecting a battery involves carefully attaching the positive (+) and negative (-) terminals to the designated posts on your travel trailer’s battery system. Before beginning, ensure your battery switch is in the “OFF” position. Locate the positive and negative terminals on both your battery and the trailer’s connection points. These are usually clearly marked with “+” and “-” symbols.
Use appropriately sized battery cables, ensuring they are clean and free of damage. Attach the positive cable first, followed by the negative cable. Tighten the connection securely using a wrench, but avoid over-tightening. After connection, check the terminals to ensure they are firmly attached.
Maintaining Battery Connections
Regular maintenance of your battery connections is key to preventing corrosion and ensuring optimal performance. Corrosion can significantly impede the flow of electricity, leading to reduced power and even battery failure. To prevent this, periodically inspect the terminals for corrosion. Clean any corrosion using a wire brush and baking soda solution. Apply a corrosion inhibitor or a battery terminal protector to the terminals after cleaning to help prevent future corrosion.
It’s also advisable to check the tightness of the connections regularly, tightening them as needed.
Safety Precautions When Working with Batteries
Working with batteries requires caution. Batteries produce corrosive acid and can generate sparks, posing risks of burns, explosions, and electrical shock. Always wear safety glasses and gloves when handling batteries. Ensure the area is well-ventilated to avoid inhaling harmful fumes. Never short-circuit the terminals by accidentally touching them together.
If you spill battery acid, neutralize it immediately with baking soda and water. If you are unsure about any aspect of the process, seek professional assistance.
Comparison of Battery Connection Methods
Different methods exist for connecting batteries in a travel trailer, each with its own advantages and disadvantages. The best method depends on your specific needs and setup.
| Connection Method | Pros | Cons | Suitability |
|---|---|---|---|
| Direct Connection (Clamps) | Simple, quick connection. | Prone to corrosion, can loosen over time. | Temporary connections, easy access. |
| Bolted Connection | Secure, less prone to corrosion. | More complex to install, requires tools. | Permanent installations, high-current applications. |
| Quick Disconnect Terminals | Easy connection and disconnection, corrosion resistant. | Higher initial cost, potential for failure if not properly maintained. | Frequent connection/disconnection needed. |
| Battery Terminal Protectors | Reduces corrosion, protects terminals. | Requires additional purchase, can interfere with connection if improperly installed. | Long-term maintenance, prevention of corrosion. |
Battery Switch and Electrical System Integration
Your battery switch is the central nervous system of your travel trailer’s power, controlling the flow of electricity from your batteries to the rest of your electrical system. Understanding how it interacts with other components is crucial for safe and efficient operation. This section will explore the relationship between your battery switch and key electrical components, along with wiring considerations and the impact of different battery types.The battery switch acts as a gatekeeper, selectively connecting or disconnecting your batteries from the rest of your RV’s electrical system.
This means it works closely with the converter, inverter, and your trailer’s various electrical appliances. When the switch is in the “on” position, power from your batteries flows to the converter, which transforms 12V DC power from the batteries into 120V AC power for your household appliances. The inverter, on the other hand, performs the opposite function, converting 12V DC from your batteries into 120V AC power, typically for higher-power appliances or when shore power isn’t available.
Battery Switch Wiring in a Basic System
A typical setup involves wiring the positive (+) cable from your battery(ies) to the battery switch’s input terminal. From the switch’s output terminal, a positive cable runs to the main power distribution panel of your travel trailer. A separate, heavy-gauge negative (-) cable connects directly from your battery(ies) to the chassis ground of your trailer. This ground provides a return path for the electrical current.
It’s crucial to use appropriately sized wiring to prevent overheating and voltage drop. For example, a dual battery system with 100Ah batteries might require 4-gauge wiring for the positive cable and a similar gauge for the negative cable connected directly to the chassis. All connections must be secure and properly insulated to prevent shorts.
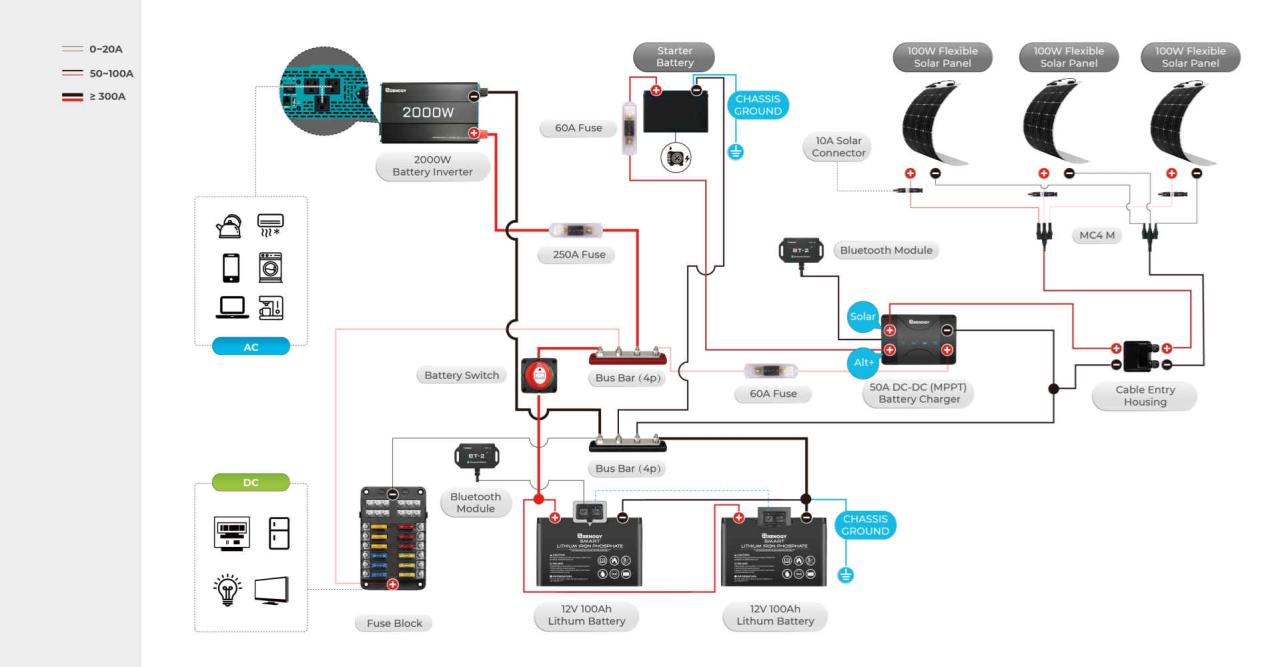
Battery Type Impact on Switch Functionality
Different battery types have different voltage outputs and charging characteristics. Lead-acid batteries are common but have a lower energy density and shorter lifespan compared to lithium batteries. Lithium batteries, while more expensive, offer higher energy density, longer lifespan, and faster charging times. The battery switch itself isn’t inherently affected by the battery type, but the wiring and safety precautions may need adjustments.
For example, lithium batteries often require specialized battery management systems (BMS) that may need to be integrated into the wiring setup. Using the wrong type of fuse or breaker with lithium batteries can be dangerous, requiring careful consideration of amperage ratings.
Battery Switch Use in Different RV Setups
A single battery system is the simplest, with one battery connected directly to the switch. A dual battery system, however, offers redundancy and increased capacity. The battery switch in a dual battery setup allows you to isolate one battery (e.g., for starting the tow vehicle) while still using the other for powering your RV’s appliances. In this setup, each battery usually has its own positive and negative cable running to the switch, and the switch then controls which battery (or both) is connected to the main power system.
More complex systems, such as those with solar panels or generators, will have additional wiring and components interacting with the battery switch. Properly sizing the battery switch itself (in terms of amperage rating) is vital for any setup to prevent damage to the switch and the overall electrical system.
Visual Representation of Battery Switch Operation: Battery Switch On Travel Trailer Function
Understanding how a battery switch works is crucial for managing your travel trailer’s power. This section provides a visual and descriptive explanation of its inner workings and how the different positions affect your electrical system. Think of it like a sophisticated three-way light switch, but for your batteries and appliances.Imagine a simple diagram: Two batteries (Battery 1 and Battery 2) are represented by circles.
These circles connect to the switch via thick lines representing the heavy-gauge wiring. From the switch, another thick line goes to the trailer’s electrical system (represented by a house symbol). Inside the switch itself, several metal contacts move depending on the switch’s position. These contacts create or break the electrical connections between the batteries and the trailer’s system.
Battery Switch Components and Functions
The main components of a typical battery switch are the switch handle, the internal contacts, and the terminal connections. The switch handle allows you to select different positions, physically manipulating the internal contacts. These internal contacts are typically made of robust, corrosion-resistant metal. They precisely connect or disconnect the battery circuits according to the selected position. The terminal connections are heavy-duty clamps or posts where the thick wires from the batteries and the trailer’s electrical system attach.
These terminals must securely hold the wires to prevent voltage drops and potential hazards.
Battery Switch Positions and Electrical System States
A typical battery switch has three or four positions. Let’s consider a three-position switch: “Off,” “Battery 1,” and “Both.”In the “Off” position, all contacts are disengaged, completely isolating both batteries from the trailer’s electrical system. This is important for preventing accidental drain or short circuits when the trailer is stored for extended periods.In the “Battery 1” position, only Battery 1 is connected to the trailer’s electrical system.
Battery 2 is completely isolated. This allows you to use only one battery, which is helpful for conserving power or when one battery needs charging separately.In the “Both” position, both Battery 1 and Battery 2 are connected in parallel to the trailer’s electrical system. This effectively doubles the available power capacity, useful for running high-power appliances like air conditioners or microwaves.
Think of it like adding two water tanks together to have double the water supply.Some switches also have a “Battery 2” position, mirroring the “Battery 1” functionality, but using Battery 2 as the primary power source. The internal mechanism is similar in all positions, with different contact arrangements determining which battery or batteries supply power to the trailer’s system.
A key aspect is that these switches are designed to handle significant current, so they are robust and built to last.
Mastering your travel trailer’s battery switch is about more than just flipping a switch; it’s about ensuring safe and reliable power for your adventures. By understanding the function, maintenance, and troubleshooting of your battery switch, you can prevent frustrating breakdowns and enjoy peace of mind on the road. Remember to always prioritize safety when working with batteries and electrical systems.
Happy travels!
FAQ Overview
What happens if my battery switch is faulty?
A faulty switch can lead to no power to your appliances, or even damage to your batteries or other electrical components. Symptoms include lights not working, appliances not functioning, or a blown fuse.
How often should I test my RV batteries?
It’s a good idea to test your batteries at least every three months, or more frequently if you’re using them heavily.
Can I use any type of battery with my battery switch?
While many switches work with various battery types, it’s best to check your switch’s specifications and your RV’s manual to ensure compatibility. Using an incompatible battery could damage the switch or the battery.
What are the signs of a corroded battery connection?
Look for white, powdery buildup on the battery terminals or cables. This is a sign of corrosion, which can impede current flow and damage your battery.
